What is a Roughness Map and How Do You Use It?
The roughness map is one of the most powerful tools in your PBR arsenal. A single grayscale texture determines whether a surface looks like a matte concrete wall or a polished mirror — and every gradation in between. Get it right and your materials feel real. Get it wrong and nothing will look convincing no matter how good your other maps are.
What is a Roughness Map?
A roughness map is a grayscale texture that tells the renderer how microscopically rough or smooth a surface is. It's one of the two core maps in the PBR Metal/Roughness workflow — the other being the Metallic map — and it has a dramatic effect on how a surface reacts to light.
Every real-world surface has microscopic irregularities at the surface level — tiny bumps, scratches, pits, and facets too small to see with the naked eye. These micro-irregularities scatter incoming light in different directions. A smooth surface has very few irregularities, so light bounces in a consistent direction — producing sharp, focused reflections. A rough surface has many irregularities, scattering light in many directions — producing blurry, diffuse reflections or none at all.
The roughness map encodes this microscopic surface property as a simple 0–1 value. No complex data, no color — just a brightness value per pixel that tells the PBR shader how to distribute reflected light at that point on the surface.
How Roughness Affects Light
The visual difference between a rough and a smooth surface is entirely about how reflections behave. This is the clearest way to understand what the roughness value is actually controlling:
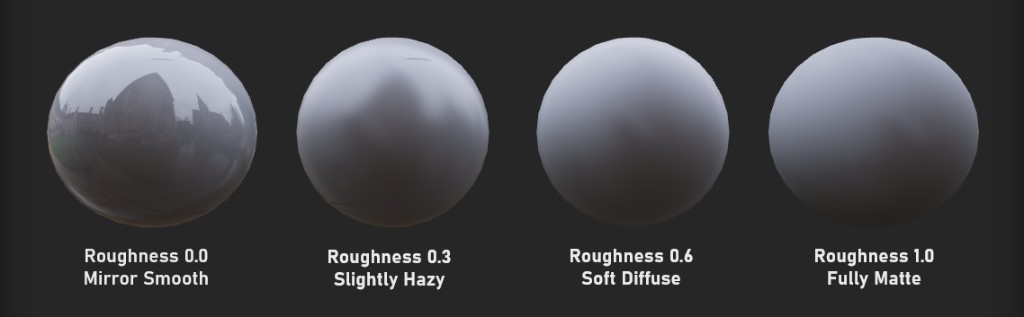
⬛ Low roughness (0.0 – 0.2)
Tight, sharp specular highlights. Clear reflections of the environment. Surfaces look polished, glossy, or wet. Examples: mirror glass, polished chrome, lacquered paint, still water.
⬜ High roughness (0.7 – 1.0)
Wide, blurry or invisible specular highlights. No clear reflections. Surfaces look matte, chalky, or powdery. Examples: raw concrete, unfinished wood, chalk, fabric, dry soil.
The 0–1 Roughness Scale
Roughness is always stored as a value between 0 and 1. In a grayscale roughness map, black (0) = perfectly smooth and white (1) = fully rough/matte. Every shade in between represents a different surface finish.
Real World Roughness Values
One of the biggest advantages of PBR is that roughness values correspond to real physical surface properties. This means there are well-established reference values for common materials. Using these as a starting point will save you a lot of guesswork.
| Surface | Roughness Range | Notes |
|---|---|---|
| Human skin | 0.4 – 0.6 | Varies — oily areas (nose) are lower, dry areas (elbows) are higher |
| Painted wall (flat) | 0.7 – 0.85 | Gloss paint is 0.2–0.4, matte paint is 0.7–0.9 |
| Wet surface | 0.02 – 0.1 | Water creates a thin smooth film over any surface, dramatically lowering roughness |
| Rusted metal | 0.7 – 0.9 | Rust breaks down the smooth surface finish of metal completely |
| Plastic (glossy) | 0.1 – 0.3 | Hard glossy plastics like ABS or acrylic sit in this range |
| Asphalt / tarmac | 0.85 – 0.97 | Very rough aggregate surface. Wet asphalt drops to 0.3–0.5 |
Painting Effective Roughness Maps
The roughness map is where you tell the story of how a surface has been used and aged. A brand-new object might have a uniform roughness value everywhere. But a used object develops variation — wear on raised edges, grime in recesses, fingerprints on handles, polish on contact areas, rust on exposed iron.
Here are the most important roughness painting techniques to know:
Lower roughness on raised edges and corners. Contact points polish smooth over time. Use curvature maps to automate this.
Higher roughness in crevices and recesses where dirt and grime collect. Use AO maps as a mask to drive this automatically.
Add subtle noise to any uniform roughness value. Perfectly flat roughness looks synthetic — real surfaces always have variation.
Dramatically lower roughness in areas where liquid would pool or run. Puddles, condensation rings, and wet patches all read as much lower roughness.
Raise roughness in corroded or oxidized areas. Rust is extremely rough. The contrast between polished and rusted metal is one of the most visually compelling roughness patterns.
Lower roughness in handled areas where skin oils leave a slight sheen. Particularly effective on glass, screens, and polished metal surfaces.
Roughness vs Glossiness — What's the Difference?
You'll sometimes encounter a Glossiness map (also called a Gloss map or Smoothness map) instead of a Roughness map. These describe exactly the same property — they're just inverted from each other.
Roughness Map
Black = smooth. White = rough. Used by default in Unity (Metal/Rough workflow), Unreal Engine, Godot, and most modern PBR tools including Trumble.
Glossiness Map
White = smooth. Black = rough. The exact inverse. Used in older Specular/Gloss pipelines and some legacy tools. Sometimes called "Smoothness" in Unity's older Standard shader.
Converting between them is trivial — just invert the image. If you receive a glossiness map but your engine expects roughness, invert the texture in Photoshop, Krita, or any image editor and it becomes a roughness map. The math is simply: Roughness = 1 − Glossiness.